
About five and a half months until Tactica 2017 in Hamburg. This time our club is preparing a Napoleonic game featuring the British landing operation at Aboukir in 1801. Although my friend Bernhard has overall control over the project I'm glad to take part in it and to contribute some humble pieces. After all there'll be one or two rowing boats, a larger gunboat and about 50 foot figures from yours truly meaning that I really have to start preparing and painting the stuff.
With the gunboat I'm on a good way as you'll see in a later post but with the infantry units I'm more or less in the starting blocks. As revealed earlier this week there'll be a highly converted unit of British Redcoats from my workbench. For that I'm using different plastics sets by Perry Miniatures to create rather early Napoleonic uniform variations. Namely some chaps with trumplines, overalls and stovepipe shakos. Since I didn't want to use all the trumplines from the AWI sets I needed to find a way to reproduce some of pieces. Unfortunately my sculpting skills are very limited so I turned my efforts to Instant Mold:

Instant Mold is a clear material which looks slightly like hot glue. At room temperature it's rather solid with only little flexibility. But exposed to higher temperatures it becomes very soft and flexibel. This way it is useful to create simple moulds to reproduce roughly two dimensional pieces like shields, structured surfaces and such. Anyway I wanted to have trumplines so I tried some more complex one piece moulds...
But let's do it step by step:
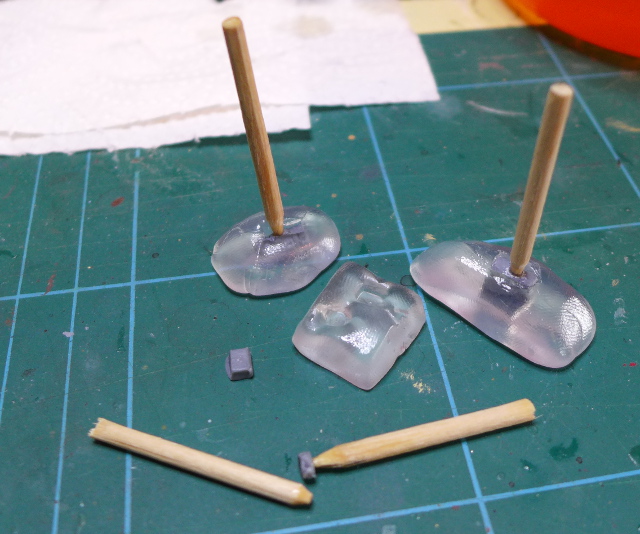
First of all we need our templates of course. for that I took the pieces I wanted to copy and unsprued them carefully. Then I removed all the cast lines and flash I didn't want to reproduce and glued them onto shashlik skewers to make them more handy.


Then you need to take an appropriate piece of Instant Mold and put it into hot water. The label says about 70 °C so I mixed hand-hot and boiling water - excellent opportunity to prepare another cup of tea by the way. After a couple of seconds the material becomes crystal clear, soft and somehow sticky.

Now take the templates and press
them into the soft Instant Mold material. Try to reshape the material carefully
because we don't want distorted castings later. Then let the stuff cool down.
For the three dimensional pieces (the backpack and the trumpline) I pushed the
templates deeper into the material and covering nearly the whole piece but
leaving a slot insert and remove the impression material (e.g. greenstuff) later.
Now prepare a sufficient amount of
greenstuff and fill the moulds with it. Use some pressure especially when
working with deeper moulds and watch out for air bubbles that might get caught
within the moulds. At the deeper moulds leave a sufficient amount of greenstuff
outside to have a handle to pull out the finished piece later. Now let
everything harden. I waited for about 24 hours to make sure that the greenstuff was really, really completely cured.

By the way now I discovered that the
mould for the backpacks wasn't completely leakproof. Somehow a thin skein of
greenstuff went through the Instant Mold material and created a kind of casting
flash.

Anyway after evrything was dry and
hard the pieces were easy to remove. Especially the trumpline turned out better
than I dared to expect. Only the backpack didn't turn out too good. Maybe the
piece is too large for greenstuff to harden completely evenly.

After some cleaning I applied the
parts to a figure with superglue. Here's a WIP picture of two of the chaps:

Alltogether I'm really satisfied
with the results. Propably the moulds will not last too long but the Instand
Mold stuff is reusable if put into hot water again so it shouldn't be a
promblem to create new moulds if needed. With some norman shields I tried
Milliput as well which worked even better because the finished piece is easier
to rework since it's grindable. On the other hand it's more difficult to cut
without splintering. So maybe I'll try it but for the trumplines with the large
handle to remove them from the mould greenstuff might be the best material.
In case that you're interested in this way of press moulding then have a look at Youtube. The search string 'instant mold' brings a couple of interesting videos: Link to Youtube.
Great work on the instant mold, I have started experimented with it my self with mixed result. But using it on backpacks like this is suppurb.
ReplyDeleteReally nice work Stefan.
Very interesting, off to find some
ReplyDeleteThe results you got do indeed look rather promising. I myself am no good sculptor at all so was looking at that stuff too. I never was sure if it'd work for what I had in mind, so never gave it a go. Now you got me thinking again.
ReplyDeleteI am in the same position. I am no good at sculpting from scratch, but using Insta Mould to copy various bits of kit and then combining them can give results almost as good.
DeleteGreat w.i.p. work!
ReplyDeletevery cool Monty
ReplyDeleteInstant mold seems to work very nicely! Looks like it will be an interesting game you'll be putting up at Tactica
ReplyDeleteExcellent!! I've not heard of this before??? Cool post Stefan!
ReplyDeleteNice work - I need to get some of that insta-mold - it looks to be very useful on the workbench
ReplyDeleteI use this stuff. A great addition to the toolkit. I'd make a two piece mold for he backback.
ReplyDeleteWow! Thanks for sharing! I'm going to have give it a go!
ReplyDeleteMany thanks, chaps!
ReplyDeleteI'm really glad to hear that you found my humble tutorial inspiring.