Showing posts with label Terrain. Show all posts

Monday, 15 May 2017

Resin hardened, river finished

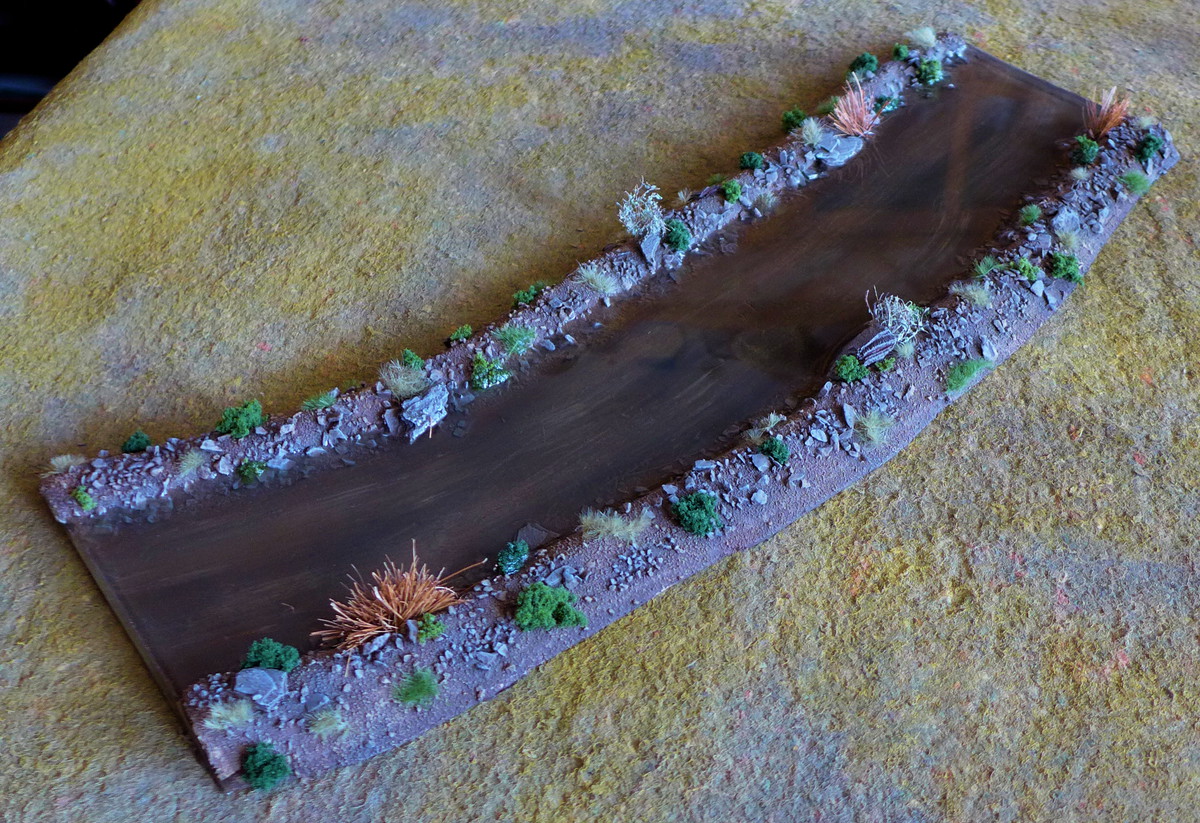
Actually the resin hardened as fast as stated on the bottle - namely in more or less 8 hours. However in my humble opinion the result is really satisfying. Especially because it was my very first workpiece with resin:
As you see it dryed cristal clear and provides nice depth to the river. Overall I didn't discern significant shrinkage. Only the edges became slightly bent up.
Yesterday I fetched my trusted rowing boat and took a couple of shots. Unfortunately as poorly illuminated as the former pictures:


After all using the two-component resin was much easier to use than I was feared. Especially the 2:1 mixing ratio is simple to handle. Now I'm pondering about using some water effect gel like Noch Wassereffekte or Woodland Scenics Water Effects to represent ripples and waves...

Thursday, 11 May 2017

River with resin water

During the last weeks I've been working on a couple of things: Some more Black Plague survivors, some tribesmen and Brits for Northwest Frontier and a nearly forgotten project of mine: A river.

Actually the realisation of the issue came together by chance. Somehow some pieces of MDF I acquires months ago fell into my hand just in time when peripatetic Mrs Monty spend a couple of days by the sea with those Janus-faced creatures yours truly calls his beloved daughters. However buoyant, joyful and frivolous as I was I collected my trustworthy jigsaw and decided to bring this long procrastinated project into being. A far reaching decision as you will discover later.

Initially things started easy. The MDF board was literally cut into shape in no time. The river banks were constructed of 10mm polystyrene, shaped with our Crème Brulée torch and covered with two layers of plaster bandage. A mix of sand, gravel, pine bark and PVA glue made it a reasonable structured riverside than :

Now I had to decide whether to target for blueish water or to emulate a muddy, brownish river. After some pondering and a series of two experiments I opted the dirtier version. In my humble opinion it looked more credible and it appeared more useful for my ongoing NWF and Congo projects:
After the embankment was humbly colored and planted yours truly had to decide how to recreate the river itself. Robert, a friend of mine and well-known contributor in the Lead Adventure Forum as 'Steam Flunky', designed a awesome 15mm with a river of resin running through it. Since I caught sight of this piece of art I was keen on creating a resin river myself. Thus I consulted a specialist dealer for epoxy resin and saturated polyester resin. The truly kind and helpful salesmen there suggested a two-component epoxy resin called 'Resinpal 2416'. Thus I ordered about three pounds of the stuff and prepared the piece for pouring:
From various online tutorials and Youtube videos I learned that sealing the mould is absolutely essential. Thus I created two clasp pieces for both ends of the terrain piece. They are made of a slat of wood, a strip of sponge rubber and a thin layer of plastic film. The idea was to create a piece which is able to carry pressure (wood), to cling to small irregularities and to provide a surface the resin would not stick to.

After that the resin was to be mixed. Fortunately this Resinpal 2416 needs a very comfortable ratio of 2:1 meaning two pieces of resin and one piece of hardener. Yours truly calculated 225g of material needed to cover the riverbed with 5mm implying 150g of resin and 75g of hardener. No problem with Mrs Monty's trustworthy kitchen scale.
Because I wanted a rather muddy river I added some - namely 15 - drops of Armypainter Quickshade 'Strong Tone' and produced a clear but brownish liquid. Then finally the moment of truth came and the resin was to be poured into the carefully prepared river bed. Please join my and be eye witness of the exiting moment:

Afterwards the most exhausting hours came. The resin had to set and to harden. How would the resin set? Would it really harden dry and non-sticky? Would it remain clear?

Questions over questions... Stay tuned.

Wednesday, 24 August 2016

Shrubbery from Rubberised Horsehair

A while ago our fellow Dave presented an excellent tutorial about making hedgerows out of rubberised horshair. Actually it's a stuff from upholstery business but in the days of disposable low-budget furniture and synthetic padding it's pretty unusual. Due to this I foundered on acquiring this stuff until Dave kindly and generously sent me some of his clippings. Actually a pretty large amount of horsehair so I'll be able to tart my NWF collection up with enough shrubbery for a medium sized battlefield. Many thanks again, Dave!

Finally during those holiday weeks I managed to try working with the stuff and prepared a couple of test pieces myself. 

1.) Bases:


As most of us I have a pretty large amount of those green plastic bases which are supplied with the Perry plastics. Now I found a proper use for them and employed a couple of them as bases for my shubbery test pieces. For this I simply unsprued a couple of them and rounded the edges. Not perfect but sufficient for test pieces. For the real terrain pieces of course the shape should be much more irregular.

Wednesday, 4 November 2015

Crisis coming! Estate finished... Finally!

Two days until Crisis 2015... Huzzah!

Yours truly is keen on this show. A trip with some good friends, good Belgian beer and the most important wargames show on the European continent. I'm really looking forward to see some chaps from the UK who are coming over. Mostly traders but some other hobby fellows as well.

As I mentioned a couple of time before our club is preparing a 28mm game featuring the battle of Plancenoit meaning the Prussian advance towards Waterloo in June 1815. Since neither Prussians nor French are my cup of Napoleonic tea I agreed to prepare a couple of buildings for the table. Now I finished the largest one... Finally:
The model itself is by Grand Manner. A wonderful piece from Dave Bodleys gifted hands but rather too modern since it came from his WW2 range. Thus I removed some parts of the estate as mentioned earlier here.
Last weekend I painted roofs and sealed my humble work with two coats of varnish. Afterall I'm really satisfied with the result. It was an excellent chance to improve my building skills and thus I'm planning to make more terrain during winter time.

In case that you'll be in Antwerp please let me know or just come by our table. We'll be near the main entrance just behind Magister Militum and Caliver Books.


Sunday, 23 August 2015

Paint Table Sunday - Slow but steady progress

During the week I painted a modern trooper for my Mordern Warfare side project but actually I'm still busy with terrain pieces namely ruins.

Since last week I worked on the outer walls and more or less finished them. Thus I started with the stones themselves and after painting them with dark red I drybrushed them with different brownish red colours. Finally a slight wisp of 'Pale Sand' to outline the edges of the stones and to connect them to the plastered parts of the walls which I drybrushed with different beige colours as well.
Although I've got window frames for the ruins as well I decided to turn my attention to some interior fitting first. For both ruins there are pieces of plank flooring to be painted and some storey floors as well. So I started with those pieces today and drybrushed the planks with different brown and beige colours to enhance the wonderfully carved out wood grain.
Since we'll need my two ruins for another game of Bolt Action next week I'll try to complete the next step until then. We'll see...

Until then please don't forget to have a look at the Google+ community dedicated to 'Paint Table Saturday'.

Enjoy your weekend!

Monday, 15 June 2015

Example ruined wall finished

As mentioned in the Paint Table Saturday post I've been working on some ruins lately. Actually for our Plancenoit club project but more or less for my own collection as well. So finally last Sunday morning I set up the airbrush equipment and spent two hours with spraying twelve horses for two British limber teams and two ruined buildings I assembled last week.

After lunch I started to paint one of the ruined wall pieces to experiment with different colours for the bricks and the plastered parts of the walls. The final result for the first pieve is this:
Actually I'm really happy with the result. I applied Vallejo Model Air (VMA) 'Hemp' as base colour for the plastered areas by airbrush and drybrushed it with Vallejo Model Color (VMC) 'Stone Grey' and 'Pale Sand' afterwards. For the bricks I used VMA 'Hull Red' as base colour and accented with different shades of red-brown tones. E. g. VMC 'Cavalry Brown' and VMC 'Red Leather'. Finally I gave them a light dust of VMC 'Pale Sand' to underline the edges of the bricks and to create a blending to the plastered area.

During the next days I'll work on the other pieces and I'll try to get some WIP steps photographed if you are interested in them.

Saturday, 13 June 2015

Paint Table Saturay - Ruins, hussars and documentary

It's weekend again... The best part of the week. Today we have a couple of friends visiting us for an old-school pen and paper RPG session but nevertheless there's some work on my painting table.
First and foremost the walls of the two ruins I'm still working on are finished and I'll colour them with my airbrush tomorrow.
Additionally i digged six hussars from the bottom of my lead pile. I painted their horses nearly two years ago but somehow I took a break after six riders. Thus it's time to finish the unit finally.
And last but not least I worked on my documentary book with my colour recipes. Last week I prepared some material from other authors. Some Artizan painting guides, WW1 painting guides by expert painter Mark Hargreaves and the Vallejo triads by Andrew 'Loki' Saunders. My plan is to collect these excellent material and add my own humble recipes. By now it seems to work rather well to support my week memory this way...


Saturday, 6 June 2015

Paint Table Saturay - Ruins


Huzzah! It's weekend again! Finally!
Two weeks to go until we'll have our crazy one day trip to Waterloo but somehow that's putting me into the right mood for preparing my part of our club's great 2015 Plancenoit game. Besides a couple of lancers I promised to build at least two ruins for the embattled village. Those are currently on my workbench to be assembled during the next days:
Once again I went for the kits from the wonderful range of Stronghold Terrain. Both are interpretations of buildings fitting into Belgium or Normandy more or less. Therefore perfect addition to my own collection because I'll be able to use them for Napoleonics as well as WW1 and WW2 games. Both houses come with plaster and resin parts and are qualitatively outstanding. Well sculpted and cast in absolute superior quality. Excellent stuff from Elmar and Mirco!

One of the ruins was published a short while ago and Elmar this crazy fellow made a diorama upgrade kit for it. Another 24 resin parts including floor tiles, stairs, windows, wallpapers and other wonderful stuff. It'll be a lot of work to include that but I'm looking forward to this experience.

Enjoy your weekend !

Monday, 1 June 2015

Dark Ages Pit House finished.

Last week I finished a model that I started a couple of weeks ago. Somehow with terrain building I'm even slower than with painting. Anyway finally The pit house for my Dark Ages village is completed:
It's one of the wonderful resin kits Stronghold Terrain produces. Elmar and Mirco have an excellent range of buildings which were modelled on buildings within a German outdoor museum.
The kit includes a solid and wonderfully sculpted baseplate, the six or seven part building and two straps of teddy fur to tile the roof with. All the pieces were cast crisp and clear and needed literally no cleaning. They fitted very well and I used two-component adhesive to glue everything together. Except of the roof to simplify putting figures inside.
As usual I painted the house with Vallejo Model Colors. Afterwards I applied different sorts of static grass, flowers and clumb foliage to top the base off.
Judge the result yourselves but I'm pretty satisfied with it. It's a nice company for the Dark Ages cottage I built last year and most likely I'll add some more buildings to the village. Momentarily I've got other projects to bring forth but at least a wonderful furnace is lurking around my lead pile...

Monday, 19 January 2015

Do it yourself Gaming Mat

Last year I followed several threats in different forums which covered DIY gaming mats. Really I was wondering whether it's much work and whether I would be able to create such a thing myself. Finally shortly before Christmas I went to our local hardware store and bought the missing components. I was a bit hesitant so I started with a small 50cm by 50cm test piece.

Here's the material I used:
  • a 50cm by 50cm piece of canvas on a stretcher frame
  • a tube of acrylic sealing compount
  • tinting paint in my terrain base colour
  • some sand and gravel
  • a couple of scoops and trowels
  • some static grass
  • old newspaper to cover our dinner table and prevent severe trouble with usually peaceful Mrs Monty
First of all I prepared the basic pulp for the gaming mat. Therefor I mixed the (whole) acrylic compound with tinting paint, sand, gravel and a few drops of water until it blended to a smooth paste.
Afterwards I and my little helper spread the mixture over the canvas and smoothed it slightly. With the sand and the gravel it becomes a rather rough surface. More or less the same as if you glue sand onto a wooden surface when building usual gaming tiles.

Then we spread static grass, little pebbles and some turf onto the wet pulp and pressed it into it slightly. Most of all I wanted to try which components stay in the mat when dryed and which fall of...
Finally we let the mat dry. It seemed like ages for me but probably it was one or two days really. Then I draybrushed the mat with medium brown and ivory. Just the colours I used for my other terrain tiles. The result is satisfying I think.
Lastly I cut the mat off the frame and rolled it around a piece of pipe insulation foam to store it.
After a couple of days I unrolled it again and the canvas set smoothly after a few minutes. So I think the acrylic pulp works rather well.

As you see it found first use when Viktoria set up our crip under the christmas tree:
Rather soon I'll repeat the experiment on a larger scale to create a playing area for SAGA games so roughly 1,20m by 1,20m or something like that. For this I'll try felt cover sheeting as basic fabric. It's much cheaper than canvas and more flexible.

Monday, 23 June 2014

Wattle Fences done

Last week I finished some wattle fences for my Dark Ages village but because of the longish post about the Roman festival I haven't presented them yet. So here we go...
Current status of the village...
At present the core of the village is the Dark Ages cottage. While I have some older terrain parts like walls and hedge the wattle fences are the second larger part. A kind friend of mine presented them to me when he got aware that I was looking for some. He found them years ago by chance on a show and bought them. Luckily for me he's been doubting now whether he'd ever use them...
Some of the longer pieces.
Anyway the pieces are very nice and clean resin casts. I washed them with warm water and washing-up liquid. Afterwards primed them with Vallejo Model Colour paints and some Armypainter Quickshade Dark Tone.
Some of the shorter pieces.
Unfortunately I don't know the maker of those nice pieces but I could use some more, especially gates. If anyone regonises those bits please let me know the manufacturer.

By the way on the picture above you see the Saga levies I finished last week as well. More on them in my next post...

Tuesday, 3 June 2014

Dark Age Cottage finished !

After an enjoyable saturday with a great game of Saga (AAR will follow soon) I found some time on sunday to sit down at the painting table and work a bit on my Dark Ages cottage. For some time I had both unexpected and appreciated help:
Viktoria will turn 4 this August and seeing me at the painting desk has been fascinating for her since her youngest days. She always wants to "help" me or paint some figures on her own and with some old remains of my lead mountain I let her do as she wants. Anyway she helped me with some terrain pieces already and spread sand on them or easy tasks like this. But this weekend we took the gloves off. First I let her slather the teddy fur for the roof of the cottage with white glue and on sunday she helped my to put a dark brown whash (Armypainter Strong Tone) on the coloured fur. Of course I'm still carefull which tasks to grant her but this weekend our joint work went really good.
So only a few finishing touches for me to do. Actually I stuck to Mirco's excellent painting tutorial for the Dark Age barn, at least as close as possible. Teddy fur was a completely new material for me so this it has been an interesting experience to work with this stuff. Actually it is much easier to use than I thought.
Besides this I didn't use anything too special: As always the reliable paints from Vallejo's Model Colour range, some Armypainter washes, pigments, my homemade terrain colour and different grass tufts, moss patches, some clump foliage and some static grass.
Really I like the result of my humble work. But that's mostly due to the excellence of the kit. The parts were well cast, needed only little cleaning and fitted very well. Actually there was no need to fill any gaps or to correct warped pieces. The resin was excellent to paint which can sometime be a problem.
All things considered the kit is really worth the 36€ Stronghold Terrain is charging for it. For value you get a great kit which is not only technically done well but historically accurate. Remarkably Mirco and Elmar sculpt their models strictly after examples they found reconstructed in open air museums. So I will gladly build up my Dark Ages village with some of their nice houses. Next on my workbench is the pit house which I bought earlier this year. My charming apprentice and I already started...

Monday, 5 August 2013

Field completed

Actually I finished the field last thursday but the weekend was too busy to get something posted. And to be honest I spent some hours with painting since it was a bit cooler than the weeks before. Maybe I'll be able to present the result (a unit of mixed British grenadiers for AWI) by the end of the week.

However here's the finished prototype field:
I'm really satisfied with this first try. Especially the track of the waggon turned out better than I thought with its puddles of glossy varnish.
Nevertheless my club fellows gave me some advice to improve the set-up. Especially the tiny stonewalls should be improved with the second edition. I'll try it with crumbled cork I presume...

Wednesday, 31 July 2013

How to till a field... Prototype WIP

Last week was a bit cooler than the week before. Therefore I was able to get some things prepared. Especially I wanted to try to pimp up some of my fields. Thereto Pat's post from January on his Silver Whistle blog inspired me (look here).

So first I chose some stuff from myoffcut box. Namely a nice sheet of plywood and some foamboard. With the foamboard I prepared the shape of the field and the plywood made an excellent base.
As field I used a part of a doormat. Since I wanted to make a partly harvested field I cut a part off it and glued it on the board with all-purpose glue because I guessed that might contract less than wood glue. Afterwards I covered the empty part of the field with rough structure paint.
Now the board had to take a breake and I let it dry over night with a pile of RPG rulebooks on it.
Meanwhile I took some offcut pieces of the doormat and cut off the bristles. They shall serve as husk on the harvested field as well as straw for a bale of straw I'm preparing simultaneously.

But be warned:
If your sweetheart isn't as tolerant as dear Mrs Monty then make sure that she is away when you cut off the bristles or do it in a secret chamber in your flat. Otherwise you frivolously risk a debate on principles about cleaning your home. There is no chance to cut the bristles without flipping them all over the working place!

Anyway the day later I proceeded with the hedgerow which shall surround the field. basically I used the same technique as for my bocage (here). Which means that I glued flocks of different clumb foliage on the fomeboard with hot glue which worked rather well once more. But mind your fingers! Hot glue means HOT GLUE !

However, I'm rather satisfied with the WIP result and I hope to get the base drybrushed this evening. Then some fining touches and the prototype is ready to test.

Wednesday, 3 April 2013

Workbench update and pigsty painted

Last week was quiet here on the blog. The preparations for our large Good Friday game took a lot of time but I didn't manage to take photos or write some lines about it. However the day went by and we spent some great time together playing Hail Caesar Fantasy. Along the way a took nearly one hundred photos which I'm grading presently and I hope to bring the first part of the AAR online until friday.

However additionally I painted the first of my new Grand Manner buildings last week: The pigsty. Although I never liked to paint scenery and terrain pieces that much this little frame house was a pleasure to paint. I cleaned it with some warm water with a drop of usual washing-up liquid. Afterwards I gave it a thin undercoat of white Vallejo Primer although Dave told me that wouldn't be necessary. However it adhered perfrectly and likewise did the colours I painted on afterwards.
As ususal I used Vallejo Model Colours and some Vallejo Game Colours. Then I applied a coat of Armypainter Quickshade (Dark Tone) and worked out the highlights afterwards.
The pigsty from the front....
For the base I used the same colours as for my gaming board. Last but not least I sprayed on a smooth coat of matt varnish.
... and from the back.
Although the house itself is finished I'll invest some further work on it during the next week. I'll put some static grass on the base, fill up the feeder with Water Effect and I'll have a look around for some nice 28mm pigs to populate the pigsty.

Overall this terrain piece is worth every penny and I looking forward to paint the larger houses soon.

Thursday, 21 March 2013

Unboxing Grand Manner

Viktoria with Dave's packet
Actually this story started some weeks or even months ago. When I planned my new gaming table I asked me which terrain pieces to acquire. There are a lot of excellent manufactureers for 28mm terrain, but the awesome stuff Dave Bodley of Grand Manner caught my eye again and again. One of our group fellows has a large collection of Dave's buildings and at Crisis 2012 I was able to satisfy myself of the quality.
Anyway I didn't place an order until February when Grand Manner offer a nice discount which balanced the high shipping cost. So I gathered with Axel and we ordered some painted and unpainted models. Delivery took reasonable four week and yesterday the packet from England arrived. This turned out to be a very entertainng event for Viktoria who was very well practiced since she opened a parcel from Granma and Grandpa earlier this day.


So Viktoria and me opened the box with greatest curiosity and Mrs Monty documented everything after she recovered her self control.

W A R N I N G
Dave's packages are very well packed with insulating material to protect the worthy contents.
I highly recommend, to unbox them either when your wife is away or after you collected the vacuum cleaner to show good will!


Viktoria and me opening Pandora's box of styrofoam snippets.
The result of our work...
Considering that Mrs. Monty had cleaned the living room this very afternoon, Viktoria and me were careful not to scatter the stuff all around. At least as much care as possible for a two-and-a-half-year-old who attaches great importance to tear every snippet at least once before putting it into the garbage bag...

However after digging which would have done honour to any professional archaeologist we discovered the much desired parcels.

With great attention and shaky hands I started to unwrap the bubble sheets. And guess what I found inside:
Another protective layer of bubble sheet...

Once again: The shipping charge might be high, but transport companies got expensive lately and Dave avoids neither efforts nor material to garantuee the undamaged arival of his stuff. Thumbs up mate!
Unwrapping the first piece step by step.
Just before dinner Viktoria and myself had unboxed and unwrapped everything and after she got to bed I took the time to have a closer look at the terrain pieces.
I was far more than satisfied, actually I was steamrolled by the quality of Dave's stuff. Even the "simple" Wargames Standard painting service comes out great. It's absolutely fine for most games and for smaller pieces it's rather affordable since Dave charges the original cost of the model again for painting. For larger buildings that can get quit expensive but anyone must judge himself whether the result is worth the charge. I avoided it this time but seeing Axel's painted things I really got doubtful.

But look yourselves:
Two gun positions usable for many periods.

A corral and to circular huts for Axel's Africa collection.

Finally my first three buildings for my new gaming board: Two houses and a pigsy mainly for Napoleonics.
Last but not least I prepared a close-up view from my Night Watchman's Cottage. As you see the casting quality is excellent. I didn't recognize any clear molding line and there are only a few flashes at out sticking corners. Naturally the whole model shows recess of mould release but I hope to get them cleaned away easily. Then the heavy tast of painting and not disfiguring the house will await me...
Close-up view on the Night Watchman's Cottage.
Conclusion:
Dave's terrain pieces are expensive. Maby some the most expensive on the market but at least the models are worth every penny. I've seen a lot of things that were only slightly cheaper but suffered either from a lack of casting quality or material quality. Both are without fail at all pieces I've seen from Grand Manner until now.
The painting service is very good as well. Wargames Standard is more then good enough for any board I've seen by now and Dave's Collector's Standard is really worth it's name. But nevertheless everyone hast to decide by himself whether he wants to engage this service or wants to spend some ours with painting the things himself. Personally I'm double-minded whether I should'nt spent my time for painting miniatures and let Dave do the terrain paintjob next time...
Unfortunately the shipping flat charge is rather high. Nearly ₤ 30 to Germany is a lot and you even could buy another terrain piece for that. But during the last years the transport companies rose their charges, Dave's packages are bulky and he uses a lot of material to protect the goods. All in all I cannot judge the shipping cost unfair but in the future I'll try to catch Dave at shows to save it.

So I hope you enjoyed this review and got an idea what is behind Grand Manner. At least after my humble first experience. I know that there are other good manufacturers and I really don't want to paly them down. But Dave has the most extensive and best researched range I know and my experience with him was just top-notch.

If you want to see more of his work, then visit the Grand Manner website (here) or have a look at the following AARs on Monty's Caravan:
- 2nd Siege on Kolberg: Part 1 and Part 2